
postfix インストール
Gmailを利用したSMTPリレーを用いたメールサーバー構築
sudo apt-get install postfix
root@raspberrypi:/home/pi# sudo apt-get install postfix
パッケージリストを読み込んでいます... 完了
依存関係ツリーを作成しています
状態情報を読み取っています... 完了
提案パッケージ:
  procmail postfix-mysql postfix-pgsql postfix-ldap postfix-pcre sasl2-bin
  dovecot-common resolvconf postfix-cdb mail-reader ufw postfix-doc
以下のパッケージはアップグレードされます:
  postfix
アップグレード: 1 個、新規インストール: 0 個、削除: 0 個、保留: 0 個。
1 個のパッケージが完全にインストールまたは削除されていません。
1,489 kB 中 0 B のアーカイブを取得する必要があります。
この操作後に追加で 3,113 kB のディスク容量が消費されます。
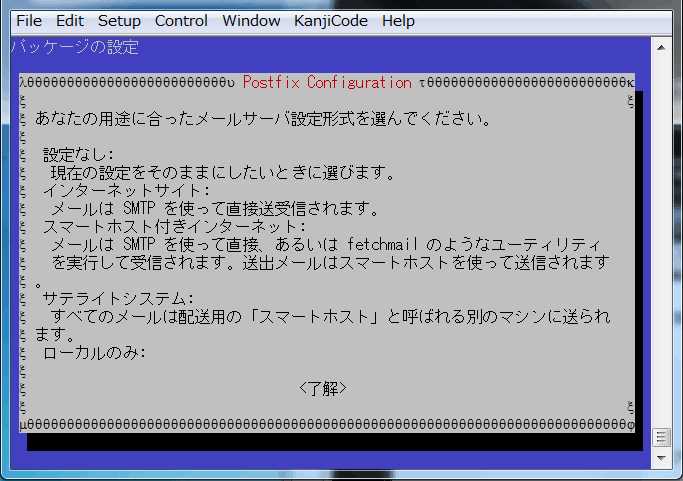
「了解」を押す。

「インターネットサイト」を選択します。
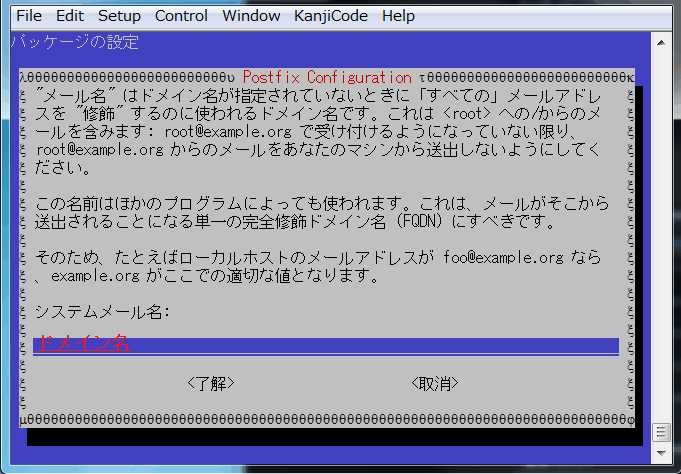
ドメイン名を入力してください。
パッケージを事前設定しています ...
(データベースを読み込んでいます ... 現在 70120 個のファイルとディレクトリがイン ストールされています。)
postfix 2.9.6-2 を (.../postfix_2.9.6-2_armhf.deb で) 置換するための準備をしています ...
grep: /etc/postfix/master.cf: No such file or directory
grep: /etc/postfix/master.cf: No such file or directory
postfix を展開し、置換しています...
man-db のトリガを処理しています ...
postfix (2.9.6-2) を設定しています ...
グループ `postfix' (グループ ID 111) を追加しています...
完了。
システムユーザ `postfix' (UID 107) を追加しています...
新しいユーザ `postfix' (UID 107) をグループ `postfix' に追加しています...
ホームディレクトリ `/var/spool/postfix' は作成しません。
Creating /etc/postfix/dynamicmaps.cf
Adding tcp map entry to /etc/postfix/dynamicmaps.cf
Adding sqlite map entry to /etc/postfix/dynamicmaps.cf
グループ `postdrop' (グループ ID 112) を追加しています...
完了。
setting myhostname: raspberrypi
setting alias maps
setting alias database
changing /etc/mailname to oem203.net
setting myorigin
setting destinations: oem203.net, raspberrypi, localhost.localdomain, localhost
setting relayhost:
setting mynetworks: 127.0.0.0/8 [::ffff:127.0.0.0]/104 [::1]/128
setting mailbox_size_limit: 0
setting recipient_delimiter: +
setting inet_interfaces: all
/etc/aliases does not exist, creating it.
WARNING: /etc/aliases exists, but does not have a root alias.

Postfix is now set up with a default configuration.  If you need to make
changes, edit
/etc/postfix/main.cf (and others) as needed.  To view Postfix configuration
values, see postconf(1).

After modifying main.cf, be sure to run '/etc/init.d/postfix reload'.

Running newaliases
newaliases: warning: inet_protocols: disabling IPv6 name/address support: Address family not supported by protocol
postalias: warning: inet_protocols: disabling IPv6 name/address support: Address family not supported by protocol
[....] Stopping Postfix Mail Transport Agent: postfixpostmulti: warning: inet_protocols: disabling IPv6 name/address support: Address family not supported by protocol
. ok
[....] Starting Postfix Mail Transport Agent: postfixpostmulti: warning: inet_protocols: disabling IPv6 name/address support: Address family not supported by protocol
postmulti: warning: inet_protocols: disabling IPv6 name/address support: Address family not supported by protocol
postmulti: warning: inet_protocols: disabling IPv6 name/address support: Address family not supported by protocol
postmulti: warning: inet_protocols: disabling IPv6 name/address support: Address family not supported by protocol
postmulti: warning: inet_protocols: disabling IPv6 name/address support: Address family not supported by protocol
postmulti: warning: inet_protocols: disabling IPv6 name/address support: Address family not supported by protocol
postmulti: warning: inet_protocols: disabling IPv6 name/address support: Address family not supported by protocol
postmulti: warning: inet_protocols: disabling IPv6 name/address support: Address family not supported by protocol
postfix: warning: inet_protocols: disabling IPv6 name/address support: Address family not supported by protocol
. ok
インストール完了後は「/etc/postfix/main.cf」の設定を行います。
vi /etc/postfix/main.cf
変更前
(中略)
relayhost =
mynetworks = 127.0.0.0/8 [::ffff:127.0.0.0]/104 [::1]/128
mailbox_size_limit = 0
recipient_delimiter = +
inet_interfaces = all
変更後
(中略)
relayhost = [smtp.gmail.com]:587
mynetworks = 127.0.0.0/8 [::ffff:127.0.0.0]/104 [::1]/128 10.1.1.0/24
mailbox_size_limit = 0
recipient_delimiter = +
inet_interfaces = all
inet_protocols = ipv4
home_mailbox = Maildir/

#add a postscript
smtp_use_tls = yes
smtp_sasl_auth_enable=yes
smtp_sasl_password_maps=hash:/etc/postfix/isppasswd
smtp_sasl_security_options = noanonymous
smtp_sasl_mechanism_filter =
次に「hash:/etc/postfix/isppasswd」にファイルを生成します。
vi /etc/postfix/isppasswd
追記する内容は以下の様になります
smtp.gmail.com [リレーさせたいgmailのアカウント]@gmail.com:[アプリケーションに固有のパスワード] あるいは
例を上げますとGmailのアドレスが「google@gmail.com]でアプリケーション固有番号が「jwyxehwzkwnwdlje」だった場合は
[smtp.gmail.com]:587 google@gmail.com:jwyxehwzkwnwdlje
と追記し保存します。
アプリケーションに固有のパスワードとは何か?
Googleが行っている2 段階認証プロセスにおいて発行されるアプリケーション固有のパスワードである。
アプリケーション固有パスワードの取得方法におきましては。
1. 2段間認証プロセスを有効にする
以下のサイトにアクセスし「2 段階認証プロセス」を有効にしてください。
* 既に有効な場合は設定する必要がありません。
https://www.google.com/accounts/IssuedAuthSubTokens?hide_authsub=1
2. 2段階認証プロセスを設定すると「アプリ パスワード」という項目が現れるのでアクセスしてください。
端末選択がありますので、「その他」を選択肢して名前は何でも良いのですが分かりやすくするために「postfix」とでも名づけておきましょう。
名前を設定後「生成」ボタンを押すとアプリケーション固有のパスワードが生成されますので、そんパスワードを先ほどのところに記述してください。
root のみが読めるようにしておく。
chmod 400 /etc/postfix/isppasswd
そして、postfixが扱うDBファイルを生成する。
postmap /etc/postfix/isppasswd
設定が終わったらpostfixを再起動させましょう。
sudo service postfix restart
sudo service postfix restart
[ ok ] Stopping Postfix Mail Transport Agent: postfix.
[ ok ] Starting Postfix Mail Transport Agent: postfix.
Dovecot インストール
sudo apt-get install dovecot-pop3d
vi /etc/dovecot/dovecot.conf
pi@raspberrypi ~ $ sudo vi /etc/dovecot/dovecot.conf
# A comma separated list of IPs or hosts where to listen in for connections.
# "*" listens in all IPv4 interfaces, "::" listens in all IPv6 interfaces.
# If you want to specify non-default ports or anything more complex,
# edit conf.d/master.conf.
listen = *
(中略)
disable_plaintext_auth = no
sudo service dovecot start
vi /etc/dovecot/conf.d/10-mail.conf
# See doc/wiki/Variables.txt for full list. Some examples:
#
#   mail_location = maildir:~/Maildir
#   mail_location = mbox:~/mail:INBOX=/var/mail/%u
#   mail_location = mbox:/var/mail/%d/%1n/%n:INDEX=/var/indexes/%d/%1n/%n
#
# <doc/wiki/MailLocation.txt>
#
mail_location = maildir:~/Maildir
sudo service dovecot restart
ポート25番と110番を解放しておこう
□ 参考サイト
https://qapla.blog52.fc2.com/blog-entry-304.shell
https://ktyama-hero.blog.ocn.ne.jp/blog/2014/04/raspberry_pi_e4.html